Saturday, April 12, 2014

Growing Parsley

Parsley


Botanical Name: 
Petroselinum crispum
Plant Type: 
Herb
Sun Exposure: 
Full Sun
Part Sun
Soil
Soil Type: 
Loamy
Parsley is a biennial plant with bright green, featherlike leaves and is in the same family as dill. This herb is used in soups, sauces, and salads, and it lessens the need for salt in soups. Not only is it the perfect garnish, but also it is healthy; it's rich in iron and vitamins A and C.
Planting and Care
Planting: 
  • For a head start, plant seeds in individual pots indoors 10 to 12 weeks before the last spring frost. For better germination, you can soak the seeds overnight.
  • Plant the seeds 3 to 4 weeks before the last spring frost because parsley is a slow starter. (The plants can handle the cold weather.) It can take up to 3 weeks for the plants to sprout.
  • Plant the seeds in moist, rich soil about 6 to 8 inches apart. For thinner plants, plant about 6 to 10 inches apart. Try to pick an area that is weed-free; that way, you'll be able to see the parsley sprouting after about 3 weeks.
  • You can use a fluorescent light to help the seedlings grow. Make sure it remains two inches above the leaves at all times.
  • To ensure the best growth, the soil should be around 70ºF.
  • Plant parsley near asparagus, corn, and tomatoes in your garden.
Care: 
  • Be sure to water the seeds often while they germinate so that they don't dry out.
  • Throughout the summer, be sure to water the plants evenly.
Pests/Diseases: 
  • Stem rot
  • Leaf spots
  • Black swallowtail larvae
  • Carrot fly and celery fly larvae
Harvest/Storage: 
  • When the leaf stems have three segments, parsley is ready to be harvested.
  • Cut leaves from the outer portions of the plant whenever you need them. Leave the inner portions of the plant to mature.
  • One method of storing the parsley fresh is to put the leaf stalks in water and keep them in the refrigerator.
  • Another method of storage is drying the parsley. Cut the parsley at the base and hang it in a well-ventilated, shady, and warm place. Once it's completely dry, crumble it up and store it in an airtight container.
  • If you want fresh parsley throughout the winter, replant a parsley plant in a pot and keep it in a sunny window.

Tuesday, March 25, 2014

I am actually copying this from here, for my own reference/memory:

http://fullofgreatideas.blogspot.co.uk/2011/07/natural-weed-killer-made-with-basic.html - if I'm breaking any copyright rules, just let me know.

I got this frugal, yet extremely effective, way of killing weeds from my neighbor. He was out spraying his weeds a couple of weeks ago and I had to inquire what he was using because all I could smell was vinegar. I love that it is safe for my family and the environment. I also love the price!

I have googled this recipe and there are a million and one different variations so I thought I would share what I used and show you how well it worked.


Materials:

  • spray bottle (I had a 34 ounce one I purchased at the $ store a while ago)
  • Pickling vinegar (It works better than regular vinegar because the acetic acid % is higher)
  • Salt (1/2 cup for m size bottle)
  • Dish soap (a squeeze)

That is it!!

Method:

Fill a spray bottle almost full with Pickling vinegar. Since my spray bottle wasn't huge, I added only 1/2 cups of salt. If you spray bottle is big, add more salt. Squirt in a dash of dish soap into the bottle. Close the bottle tight and shake, shake, shake. You are done!!!

Go outside on a bright sunny day and spray those weeds. I found the sun sped up the process so try to pick a good day to do it. Remember though, this will also kill your grass and plants too. So don't get trigger happy like me and kill other things around the garden :)

Here are the before images:


Here are the images after 1 hour (see how the color is out of the plants and they are starting to wilt):


Here are the after/end result images (I just now use a wire brush to get the dried up weeds out of the cracks):


Just to show you how well it works, here is an image where there is a weed still alive and the rest killed. I would like to say I did this on purpose to show you all how well it works but I actually missed this weed :)

The grand total was $0 since I had all the materials on hand. What more could you ask for..costs nothing, not bad for the environment and it gets rid of pesky weeds.

Happy spraying.

Saturday, August 10, 2013

Dianthus barbatus - Garofita

Garoafa - Dianthus Caryophyllus


Dianthus Caryophyllus (garoafa, garofita) 1
Dianthus Caryophyllus (garoafa, garofita) ca plante de bordura

Denumire populara: garoafa, garoafa de gradina
Familie: Caryophyllaceae
Inaltime: 45-60 cm
Diametru: 38-45 cm
Expunere: plin soare
Sol: 6,6-7,5 (neutru), 7,6-7,8 (usor alkalin)
Udare: medie - nu exagerati; la intervale regulate
Perioada de inflorire: primavara tarziu - vara
Foliaj: verde, verge-albastrui
Dianthus Caryophyllus (garoafa, garofita) 2
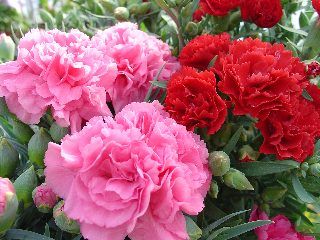
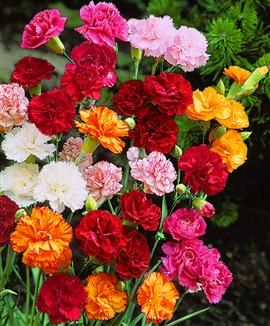
DescriereGaroafele sunt un gen de plante care infloreste anual, de doua ori pe an sau in continuu. 
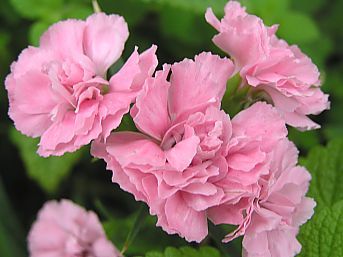
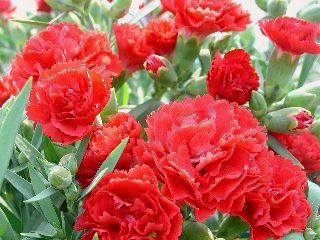
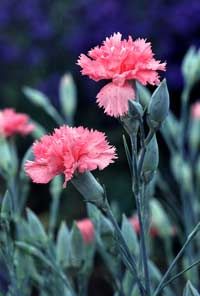
Garoafa are frunze ascutite, lanceolate, de culoare gri-verzui, asezate de-a lungul tulpinii; frunzele se intorc usor in afara. Florile pot fi parfumate, simple sau duble, de mai multe culori. Exista multi hibrizi de garoafa care nu au parfum, dar au o varietate mai mare de culori. Garoafele infloresc mai ales in perioadele cu temperaturi mai scazute ale anului, la inceputul iernii. Sunt plante perfecte pentru gradina, dar si ca flori taiate. Daca sunt ingrijite corespunzator, garoafa rezista in glastre chiar si o luna.
Originare din Eurasia, garoafele sunt unele din cele mai populare flori de gradina si se numara prin cele aproape 300 de specii de plante anuale, bianuale sau perene ale genului Dianthus. Exista sute de varietati si hibrizi. In limba greaca, "dianthus" inseamna "floarea lui Zeus" sau "floarea divina".
Garoafele pot atinge 60-90 cm inaltime, desi majoritatea varietatilor cultivate in gradina ating 25-50 cm.
Dianthus Caryophyllus (garoafa, garofita) 3
Dianthus Caryophyllus (garoafa, garofita) 4

Ingrijire si cultivareGaroafa este printre cele mai cautate flori; ele au atat valoare comerciala cat si ornamentala. Gradinarii nu stiu in general tehnicile de cultivare a garoafelor si conditiile de care au nevoie acestea. 
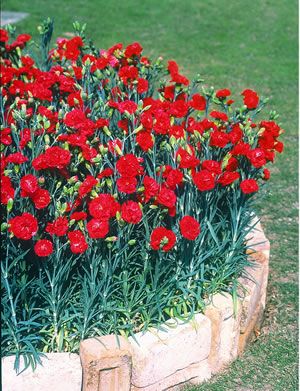
Garoafele sunt potrivite ca plante de bordura, in straturi, in gradini cu rocarie si chiar in ghivece. Ele se gasesc intr-o varietate de culori cum ar fi rosu, caramoziu, portocaliu, violet, galben, roz, alb, crem, etc.
Garoafele au nevoie de pamant fertil, usor alkalin sau neutru din punctul de vedere al pH-ului, usor drenabil si de 4-5 ore de plin soare, zilnic.
Pamantul trebuie sa fie umed. Evitati sa udati in exces florile, pentru ca acest lucru va duce la ingalbenirea foliajului. Pentru ca sa infloreasca in continuu, garoafele trebuie tratate usor cu o substanta fertilizatoare lichida (10-10-10), la fiecare 6-8 saptamani. Florile trecute, ofilite, trebuie inlaturate repede pentru a incuraja inflorirea continua.
Un alt aspect important este ciupirea florilor. Garoafele trebuie ciupite pana au numai 6 noduli pe fiecare tulpina - aceasta operatie incurajeaza dezvoltarea tulpinilor laterale, ramificatia tufei in general. La fel, si tulpinile laterale trebuie ciupite. Nu uitati ca daca tufa are mai multe tulpini, va avea si mai multe flori. De asemenea, la inceput, planta trebuie legata de un bat pentru a creste dreapta. Daca se doresc flori mai putine, la capatul unei tulpini lungi, atunci garoafa se ciupeste o data, cand are 15 cm inaltime, si apoi inca o data cand tulpinile laterale au 10-15 cm (cam la 4 saptamani dupa prima "ciupire"). Odata plantata, garoafa trebuie udata la fiecare 5-7 zile. In ghiveci, udarea trebuie facuta la 3-5 zile.
Daca garoafa este crescuta la planta de apartament, trebuie sa aveti mare grija la conditiile de temperatura si umiditate din incaperea in care este asezat ghiveciul. Aerul prea uscat dauneaza foarte mult garoafelor; acest lucru se poate regla prin stropirea frunzelor si asezarea ghiveciului intr-o pozitie in care sa nu fie expusa la surse de caldura sau la soare direct.
Dianthus Caryophyllus (garoafa, garofita) 5
Dianthus Caryophyllus (garoafa, garofita) 6

Metode de inmultire
1. Seminte. Pentru a colecta semintele, lasati capetele garoafelor sa se usuce pe planta, dupa care se taie si se aduna semintele. Daca sunt curatate corespunzator, acestea pot fi chiar pastrate mai mult timp. Se pot planta in interior, inainte de ultimul inghet, la 3 mm adancime, intr-un amestec usor drenabil, primavara sau la inceputul verii. Compostul trebuie sa fir umed dar nu exagerat de ud. Eventual, stropiti cu apa pentru a-i mentine umiditatea. Semintele vor germina in 2-3 saptamani. Cand rasadurile au crescut destul de mult, garoafele pot fi transplantate in ghivece sau drirect in pamant. Ele vor inflori in 6-9 luni sau chiar un an.
2. Butasi. Acestia se recolteaza de la orice garoafa, dar cei mai calitativi sunt cei de pe plantele de un an, dupa ce aceasta a inflorit. De fapt, tulpina florii este de cele mai multe ori singurul element din care garoafa isi va dezvolta o alta tulpina destul de lunga, capabila sa infloreasca la randul ei. Butasii se preleveaza cel mai bine la inceputul toamnei. Ei vor prinde radacini de la nodul umflat ascuns sub fiecare frunza. Faceti o taietura inclinata (nu dreapta!) imediat sub un nod si indepartati partea de sus, lasand inca un nod din care sa creasca tulpina noua. Butasul se infige intr-un ghiveci cu pamant usor drenabil, sau intr-o rasadnita.
3. Marcotaj. Este cea mai simpla metoda de inmultire a garoafelor, aplicabila numai cand planta s-a maturizat complet. La o tufa de garoafe, cautati tulpinile care stau desprinse de grup sau care cad inspre pamant. Este posibil ca acestia sa fie deja inradacinati, dar daca nu, iata ce trebuie sa faceti: aplecati tulpinile pana ating pamantul si fixati-i cu o piatra sau, mai bine, cu un carlig de fier; taiati toate florile care cresc pe tulpina respectiva. In cateva saptamani, veti vedea ca garoafa a prins radacini. O alta metoda, usor diferita este ca tulpina sa fie putin ingropata in pamant. Odata de radacinile ating 10-12 cm lungime, taiati noua planta si transplantati-o intr-un ghiveci sau in gradina, in pamant usor drenabil.
4. Garoafele mai pot fi inmultite prin divizarea radacinilor. Scoateti din pamant ghemul de radacini si impartiti-l cu grija, cu mana sau cu o foarfeca de gradina. Fiecare segment de replanteaza intr-un amestec usor drenabil, care trebuie mentinut mereu umed.
Lavinia Rorich
Gradinamea.ro

Saturday, May 11, 2013

Growing your own tomatoes

Growing your own tomatoes can be very rewarding - the resulting tomatoes are much more tastier, you always have fresh fruits, and you have a high level of satisfaction by eating your own product.

Nevertheless, it's not completely free of issues either. I was looking for some good advice about growing your own tomatoes, and found this great link:
http://www.tomatogardeningguru.com/planting.html

Last year I didn't follow much of these advices, but did take care to provide them with a lot of water, plant them in the sun, and remove the weeds as much as possible. This is how it looked like:


and the crop:

I had to fight some tomato warms, but applying a solution helped solve the problem rather quickly.

So start planting and enjoy it!

Wednesday, May 1, 2013

Hedera helix (common ivy)

Hedera helix (common ivy)

A woody climber native to Europe, common ivy has long been collected for winter decorations and is an important food-source for wildlife.

Hedera helix (common ivy)

Species information

  • Scientific name: Hedera helix L.
  • Common name(s): common ivy, English ivy
  • Synonym(s): Hedera poetica Salisb. (nom. illeg.), Hedera poetarum Bertol. (nom. illeg.), Hedera helix var. vulgaris DC., (nom. inval.)
  • Conservation status: Not assessed according to IUCN Red List criteria; widespread, abundant and not considered to be threatened.
  • Habitat: Woodland and hedgerows.
  • Key uses: Ornamental, medicinal, traditional uses.
  • Known hazards: Ingestion can cause mild gastrointestinal upset; may cause skin allergy on contact or via airborne allergens.

Taxonomy

  • Class: Equisetopsida
  • Subclass: Magnoliidae
  • Superorder: Asteranae
  • Order: Apiales
  • Family: Araliaceae
  • Genus: Hedera

About this species

Common ivy is a popular ornamental, valued for its ability to thrive in shady places, provide excellent groundcover and cover unsightly walls, sheds and tree stumps. Many cultivars are available, including variegated forms that can be used to brighten shady depths of winter gardens.
Long collected for winter decorations, common ivy is associated with Christmas and frequently features in festive designs. It is also an important source of food and shelter for wildlife during winter.
Ivy is not a parasite, does not normally damage sound buildings or walls, and is rarely a threat to healthy trees. Regular trimming can prevent ivy becoming too heavy, a problem that can be exacerbated by the additional weight of rain and snow.

Geography & Distribution

Hedera helix is native to western, central and southern Europe. Its distribution extends from southern Scandinavia (Norway and Sweden) in the north to Latvia and the Ukraine in the east and southeast to Bulgaria, western Turkey, Greece (including Crete) and Cyprus. It is found up to about 515 m above sea level.
Common ivy is an invasive species in Australia, New Zealand and western USA.

Description

Juvenile leaves of Hedera helix (common ivy)
Juvenile leaves of Hedera helix
Overview: A woody climber (liana) with distinct juvenile and mature stages, both with evergreen leaves; the juvenile stage usually has lobed leaves and rooting stems, and the mature stage has rootless, flowering shoots with unlobed leaves. Stems are purple-green.
Juvenile leaves: Dark green, leathery, 3–5-lobed, the two basal lobes reduced in size to give the typical ivy-leaf shape. Dotted with white, star-shaped hairs.
Adult leaves: Unlobed, markedly narrower on shoots exposed to light.
Flowers: Borne in spherical clusters, each held on a stalk (peduncle), with a proteinaceous scent. From September to November.
Fruits: Yellow-orange to black berries, up to 9 mm in diameter, each containing five seeds.
Hedera helix f. poetarum is a form with dull orange fruits, found in the Mediterranean and known as poet’s ivy or Italian ivy.

Common ivy and wildlife

Ivy berries are a favoured winter food for blackbirds and if not eaten remain on the plant until spring, providing an important food-source for young birds. Branches and leaves of Hedera helix also provide shelter and nesting sites for birds, and a ready supply of insects can be found living on and around them.
Hedera helix flowers open late in the year (September to November) and are pollinated by insects such as wasps and moths. They are an important source of nectar and pollen for bees when other sources such as heather are not available.

Uses

Hedera helix 'Pennsylvanica'
Common ivy is a popular ornamental, and many cultivars are available, including non-climbing ones for ground cover and compact forms for potted plants. Being evergreen and shade-loving, ivy is perfect for winter gardens and can form an attractive covering for garden structures. Ivy was a fashionable ornamental in Victorian Britain and represented fidelity in the ‘language of flowers’.
Hedera helix is frequently used in cut flower arrangements, particularly in winter displays. The custom of decorating homes with ivy and evergreens dates back to pre-Christian times when they were associated with the power of the eternal and represented continuation of life through the winter.
Early herbalists, having seen common ivy smothering grape vines, held the belief that ivy berries could counteract the unwanted side-effects of alcohol consumption. Hedera helix has in the past been used in the treatment of verrucas, warts and corns.
Ivy wood has been used as a substitute for boxwood (Buxus sempervirens). The glossy, cream, ivory-like heartwood is sometimes used in flower arrangements.
Young twigs were formerly a source of dyes, and it is said that a red dye can be obtained from the berries when boiled with alum.
Ivy is browsed by cattle and sometimes used as an emergency winter fodder.

Common ivy as a symbol

In ancient Rome, ivy was a symbol of intellectual achievement and ivy wreathes were used to crown winners of poetry contests. They were also given to victorious athletes in ancient Greece.
The Roman custom of hanging a branch with leaves (often ivy because it was readily available, and the leaves, being evergreen, lasted a long time) on a pole to indicate that the premises sold wine or ale spread throughout Europe in the Middle Ages and became known as an alepole or alestake.

Millennium Seed Bank: Seed storage

The Millennium Seed Bank Partnership aims to save plant life worldwide, focusing on plants under threat and those of most use in the future. Seeds are dried, packaged and stored at a sub-zero temperature in our seed bank vault.
Five collections of Hedera helix seeds are held in Kew’s Millennium Seed Bank based at Wakehurst in West Sussex.
See Kew’s Seed Information Database for further information on Hedera helix seeds.

Cultivation

Where ivy is grown on structures, it should be clipped over every other year to ensure the growth does not become too heavy.

Source: http://www.kew.org/plants-fungi/Hedera-helix.htm

Allium Sphearocephalon

Allium sphaerocephalon

Allium sphaerocephalon
This green to purple summer-flowering ornamental onion looks great planted in combination with Nepeta 'Six Hills Giant', Centranthus ruber and Rosa 'Gertrude Jekyll' ('Ausbord') AGM. Its oval flowerheads stand about 60cm or more tall - insects love them, and they add movement and interest to borders.

Vital statistics


Common name
Round-headed leek
Family
Alliaceae
Height & spread
60 x 90cm (2 x 3 ft).
Form
Bulbous perennial
Soil
Fertile, well-drained soil
Aspect
Full sun
Hardiness
Fully hardy but may be tender when young
 
Round-headed leek is easy to grow. The bulbs should be planted fairly deeply, in a light well-drained soil in a sunny position. Once established the plants are fairly drought-tolerant. It grows well with most plants, especially roses, carrots, beet and chamomile, but it inhibits the growth of legumes. It should not be planted near alfalfa, as each species affects the other negatively. Plants often divide freely at the base.

allium neapolitanum

Allium Neapolitanum, which is often referred to as the Naples Onion, or the Star Of Bethlehem, and goes by a number of other names as well, is a member of the allium genus, a huge genus, consisting of many different species. It's commonly believed that not all of the species of allium have yet been discovered or classified. Many species, certainly most species, grow wild. Others are grown as ornamental plants, and yet others, such as leeks, onion, and garlic, are found in vegetable gardens or grown commercially for food. Allium species range from the Giant Allium with its blooming heads reaching nearly a foot across, to many small species, some of which are quite invasive.
allium neapolitanum Like many members of the Allium genus, Allium Neapolitanum grows from bulbs. It is hardy only in USDA Zones 7 and above, and is found primarily in California, Texas, Louisiana, and Florida, though it can be grown in pots elsewhere. Allium Neapolitanum attains a height of between 12 and 18 inches. The flowers are white, and somewhat delicate, branching out from the stem in a globe-like pattern. This allium species will grow in most soils and is somewhat drought tolerant. It is primarily propagated from bulbs and bulb offsets, but can also be grown from seeds, which may be collected once the blossoms have died back. The Allium Neapolitanum plant is native to Southern Europe, including Italy (Naples) and also native to North Africa.
allium neapolitanum The allium in general is easy to grow, and most varieties, though not Allium Neapolitanum, are quite hardy. Over time the plants tend to become somewhat crowded. They are then usually lifted from the ground and divided. When cut or bruised, most allium plants have the familiar onion odor. The blossoms on the other hand can be quite pleasantly fragrant. While most species grow from bulbs, a few grow from rhizomes and others from tuberous roots. There are several species which do not form bulbs or rhizomes at all, but are propagated either from seed or by leaf cuttings. All varieties and species are relatively easy to propagate.
allium neapolitanum Allium Neapolitanum may be forced indoors in a pot. If this species is not suitable for the climate you live in, there are so many species of allium, most of which have white blossoms, that to find an acceptable substitute may not be all that difficult. If you must have this species however, growing it in pots indoors or in a greenhouse may be the answer.